Wednesday, August 31, 2016

Bunch of Birthday Wishes

Hello Mint Owl Studio friends new and old!  Lisa here with you today and I'm sharing a very clean and simple Birthday card with you...


I love love love this balloon bouquet that is found in the Birthday Bash Stamp Set, because it is so much fun to color!  With just a few markers you can give this image lots of dimension.  To create this card I started by stamping my image and sentiment onto a white panel.  I then ran this panel through my die cutting machine to emboss my frame around the images.  Next, I colored the balloons in with various Copic markers and stamped some confetti from the Party Pals Stamp Set with a light blue ink so that they fade into the background without distracting the recipient.

Thanks so much for stopping by and don't forget to share your creations with us using Mint Owl Studio Goodies on any of our social media sites!
Happy Crafting!
Lisa

Tuesday, August 30, 2016

Hello Friend

Good morning, everyone! It's Cassie here, with another fun card using some of the new products from the August release. I'm so excited about this card. Do you ever have an idea for a project that turns out exactly how you hoped? That's how I felt about this card!

Let's take a look at the card!
This card showcases the Birthday Bash and the Banner Sentiments  stamp set. I think these two sets combined are amazing together. As you can see I made a fun scene of balloons using the solid balloon image in Birthday Bash and added the sentiments as if they were printed on the balloons themselves.
I started by grabbing a rainbow of Distress Inks. I picked two colors per balloon. To get them fade from one color the next was a lot easier than it may seem! I pressed the balloon stamp into the first color like you normally would except that I only inked up the left side of the balloon. Then I took the second color and did the same on the right side. I let the colors over lap a little, but it didn't matter if they did too much because of the next step. Once I had one balloon stamped I took a damp brush and mixed the colors on the balloon with water. It helps get rid of any harsh lines and makes the colors blend a bit more. The great thing about this look is that it isn't supposed to be perfect. Imperfections make it cute, so embrace them! 
When the balloons were completely dry I picked some sentiments that fit in the balloon and stamped them in black ink. I added strings to them using a black Copic liner and a T-square ruler. Personally I love the look of completely straight lines here, but you could go crazy and give them curly ribbon too! I added some stitched detail, which you can see better in the picture above, and some black splatters, as well as a black cardstock panel to be put behind the balloon panel. Once that was cone the card was finished!

I hope you liked this card, and that you were maybe inspired to make your own rainbow card. There is still time to enter the August Instagram challenge! That's it for me today, but I'll see you again soon with another card!

Monday, August 29, 2016

Teacher Birthday Gift/Tags!! =)

HELLO!!
Larissa here with a FUN Teacher's Birthday Gift and Gift Tags to share!! Beckett's Teacher just celebrated a Birthday and I thought it would be FUN to create something for her touse in her Classroom!! So I decided to create some Flower Pencils in a Chalkboard Painted Jar!! My Idea is to keep giving her Pencils finished with different ends all throughout the Year!! That way she will NEVER run out of Pencils and she can ALWAYS Spot one of her Pencils because of the Decorative Ends I've created!! To Start I went with Daisies!! I've used a Tag Die and then Stamped and Embossed the Flowers from the "Love for Mom" Stamp Set along with the Happy Birthday Sentiment from the "Piggy Party' Stamp Set and the Leaves from the "Bundles of Joy" Stamp Set!! I use Distress Ins to Watercolor the Images on the Tags and I really LOVE the way it accents the Jar and my Pencil Flowers!! SQUEAL!!
To create my Flowers I used some Prima Ribbon and cut apart the Daisies and layered two for each Flower!! Then I Die Cut some Felt and some Patterned Fabric then added some Felt Leaves to Finish off the Flowers!! The Jar was Painted First with some Light Pink Martha Stewart Paint after it was Dry I added some Glitter Paint just to the Letters on the Front of the Jar and let that dry!! Once Dry I I coated with some ChalkBoard Paint and then let that dry!! Once Dry I took some Fine Sand Paper and rubbed over the Jar to reveal some of the Details and Colors underneath!! Its hard to see in the Pictures but the Glitter really adds a FUN detail in real life and I LOVE LOVE LOVE the way it turned out!! I'm thinking this is going to be SO FUN to add to throughout the year!! Thinking Witch Boot for Halloween!! I CAN'T WAIT to share them with you!!
THANKS SO MUCH for stopping by today and I hope you have a FABULOUS WEEK!!
COUNTRY HUGS-N-KISSES
LARISSA   =)

Saturday, August 27, 2016

Birthday Wishes

 Hello everyone,

I'm back today with a birthday card.  I alway run out of this is the type of card so I make these the most.

I used our new Birthday Bash stamp set and created a background with the bow stamp from the set. I then used our new gift box die and cut it out of red card stock and some patterned paper.


I popped up the gift box with fun foam and adhered it to a piece of vellum that I cut out with a rectangle die.  I then added liquid glue to the back where the gift box is so that you don't see it through the vellum.  I added the sentiment with back ink and heat set it because it takes a very long time to dry and I don't have that much time.  


I added a few sequins from the Peach Passion sequins mix and called this card done!

Thanks for joining me today and I'll be back soon.

Coralynn :)

Friday, August 26, 2016

SUMMER SALE + BLOG HOP WINNER!

I'm going away on vacation, so we're going to have a sale this weekend!  Pick up some of the new stencils, stamps, or dies!


Here are a few of my favorites at the moment:


The winner of the 3 new stamp sets from our Blog Hop is:

Congratulations!  Please email me at mintowlstudio @ gmail.com (no spaces) with your mailing address within 48 hours to claim your prize!

Have a great weekend!
Tracy

Thursday, August 25, 2016

Emboss Resist Background featuring Birthday Bash

Hello and happy Thursday!  It's Tara and for today's project I am using the brand new Birthday Bash and Party Pals stamp sets from the August release!  These sets go together so well and I thought it would be fun to combine them, along with the Happy Moments sentiment set, to make a birthday card for my sweet niece!


I just love the scattering of stars image that is in the Birthday Bash set so I decided to heat emboss it all over a piece of Distress watercolor cardstock using some clear glittery embossing powder.  Then, using Distress Inks, I was able to add color over the clear embossing and leave behind a bright and cheerful starry background! And it's glittery!  


I colored the little girl from the Party Pals set using my Zig Clean Color Real Brush markers and fussy cut her out.  Next, I used white embossing powder to heat emboss my sentiment - the big scripty happy from the Happy Moments set and the birthday from the Party Pals set.


Once all of my elements were on the card I added a few sequins and some Spectrum Noir clear sparkle pen and this card is all done!  So much fun to create! 


Thank you all so much for joining me and I'll see you next time!  Bye!

Wednesday, August 24, 2016

Get Well Soon...

Hello!  It's Lisa here with you today and I'm excited to share a Get Well Card I've created with some of the newly released Die Cuts and Stamps...


To create this card I started with the new Packaged Pretty Die Cuts and die cut the square several times in each color.  I then laid them out onto my cardbase and trimmed the excess on all sides.  Next I stamped the sentiment from the Banner's 1 Stamp Set on one of the squares and finished it with ribbon and enamel dots.

Thanks so much for stopping by today and Happy Crafting!
Lisa

Tuesday, August 23, 2016

Bunch of Birthday Wishes

Hi everyone! It's Cassie here, and I'll be showing you a fun card I made using some of the newly released stamps from this month! I used Birthday Bash stamp set as well as the Packaged Pretty dies. From an older release I also used the Ice Cream Cone stencil. Let's take a look at the card!


I started this card by cutting a panel down to 4 1/4 x 5 1/2. Then I took the square die from Packaged Pretty and placed it where I wanted my cuts to be. I also cut a square out of some aqua paper that went with my color scheme. I stamped the balloons on one of the squares and colored them in using my Copics. Then I stamped the sentiment on the aqua square.
Before I put the whole thing together I placed my stencil over the panel and used some Distress Ink and an ink blended to give the background a pattern. I used two colors, and shifted the stencil slightly when doing the second color so both colors could be seen. Once that was done I put all the pieces together like a puzzle on a card base.

Once I added some glossy accents to the balloons the card was finished! I love how bright this card is. The balloons are so fun because they can be colored to match any card or theme!

That's it for me today, but I will see you all again soon with another card! Have a great week!

Monday, August 22, 2016

Bunches of Birthday Wishes!! =)


HELLO!!
Larissa here today to share a FUN Birthday Card!!
I'm using the Newly Released "Birthday Bash" Stamp Set and the "Party Pals" Stamp Set!! I thought it would be FUN to have the Little Girl Holding the Bunch of Balloon and then to have the Sentiment Stamped among the Stars in the Sky!!
I Stamped and Embossed the Images onto some Distress Watercolor Paper and then used my Distress Inks to Watercolor them!! I wanted a DEEP Blue Sky so I used Chipped Sapphire and Faded Jeans and then added alittl Seedless Preserves, Abandoned Coral and Hickory Smoke!! These Colors blend so BEAUTIFULLY and the White Embossed Stars really POP!! Makes me HAPPY!!  =) I Stamped another Bunch of Balloons and a Girl and then Water Colored them and popped them up using Foam Tape after I Fussy Cut them out leaving a small white border to help make them POP off the Background!! I think this Card is going to make someone SMILE!!
Hope you feel INSPIRED and that you'll join us for our Rainbow Challenge!!

I hope you'll play along with the August Instagam Challenge: "Rainbow"!!?? It's so FUN and EASY PLUS you could WIN a little somethin' something'!! =)
Check out the RULES below for more details and I'll see you with another card Friday!! 
Rules:
1. Create a card based on the challenge theme.
2. Upload a photo of it to Instagram.  Tag Mint Owl Studio and add the hashtag #moscardchallenge to your post.
3. Look at the other cards with that hashtag and show some love to your fellow card makers!!  Let's make this fun!!
 There is also a PRIZE with each Challenge!!  One LUCKY Participant will receive a Stamp Set of their choice!! SQUEAL!! =)  The Winner is random, so all card making skill levels are welcome!!

THANKS SO MUCH for stopping by today and I hope you have a FABULOUS WEEK!!
COUNTRY HUGS-N-KISSES
LARISSA   =)

Saturday, August 20, 2016

A Birthday Layout with New Stamps!

Hello amazing crafting friends!  It is Lisa here today and I'm going to share a layout I've made with the new stamps!  By the way did you join us for our blog hop?  Make sure you hop through and leave comments on yesterdays post for a chance to win all of the new release! Now, onto todays post...


To create this layout I started with the stars stamp from the Birthday Bash Stamp Set on the background going at a diagonal.  I then used  yellow and orange distress inks over the Half Tone Stencil at the bottom corner and on the opposite upper corner.  I then layered this with a red and blue mist.  This was set off to dry and I began stamping strips of designs on a separate white card stock.  I used the Birthday Bash Stamp Set again for the balloon image, bows and sentiments.  To get the look of designer paper I used various colored inks and randomly stamped them in rows across the card stock.  Next I diecut tag shapes out of these rows and layered them down the side next to the photos.  I then stamped the banner and balloons from this set, colored them in with Copic Markers, trimmed and adhered them to the layout.  ( I really LOVE this balloon image!)  Throw on a couple of stickers, dots and sequins and you've got yourself a Birthday Layout!

We can't wait to see what you will make with your new goodies, all of the new release is now available in the store so don't miss out!

Thanks for stopping by and Happy Crafting!
Lisa

Friday, August 19, 2016

NEW RELEASE BLOG HOP

Hello!


Welcome to our Release Day Blog Hop!  We are starting something new for release day's with this blog hop and we hope it gets you more excited for the new sets.  Make sure to hop along with our design team and leave comments on their blogs for your chance to win the entire new release!  All of the details are at the end of this post.


Hop Order:

We're also giving away the entire new release!  Want to know how to win?  All you have to do is comment on this blog and each of the blogs on the hop.  The winner will be randomly chosen from one of the blogs, so the more blogs you comment on, the better your chance is to win!  Good luck!


Wednesday, August 17, 2016

Intro to Party Pals and Banner Sentiments

Hello everyone,

I am back and excited to introduce two more sets from our August release.  Here are the two sets that I used for my card and a little sneak peak of a brand new die set that you will see soon. 


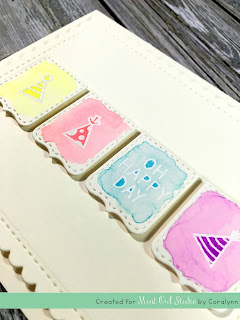
For my card today I decided to use an ivory card stock for the base and front panel. I die cut the front panel and popped it up on foam tape and added it to the base.  I die cut the little banner flags from watercolour card stock so it would match the card base.  


I used the adorable party hats from the Party Pals set and the sentiment from the Banner Sentiments set and heat embossed them with white embossing power.  I then took my Zig Clean Colour markers and added colour in rainbow order, which goes along with our August Instagram Challenge - Rainbow. I popped the banners up on foam tape and added them to the middle of the card.  


 That's it for me.  Thanks for stopping by and see you again soon!

Coralynn  :)

Tuesday, August 16, 2016

Intro: Birthday Bash!!

Hello!!
Who's EXCITED!!??
Larissa here Today to Introduce the New "Birthday Wishes" Stamp Set!!
SQUEAL!! How FUN is this New Set!!
For my Card today I Stamped and Embossed the Balloon Bundle and then used the Solid Balloon Image to add the Color to the Balloons with some Distress Inks with Masking!! I LOVE LOVE LOVE the way the Inks Blend and work together!! Then just to show how well these New Images work with the Older Stamp Sets I Stamped and Embossed the Dump Truck from the "Under Construction" Stamp Set!! I wanted the Balloon Bundle to look like its attached to the Back of the Dump Truck!!
I LOVE LOVE LOVE the New Stamp Set and I hope I've INSPIRED you today!!??

I hope you'll play along with the August Instagam Challenge: "Rainbow"!!?? It's so FUN and EASY PLUS you could WIN a little somethin' something'!! =)
Check out the RULES below for more details and I'll see you with another card Friday!! 
Rules:
1. Create a card based on the challenge theme.
2. Upload a photo of it to Instagram.  Tag Mint Owl Studio and add the hashtag #moscardchallenge to your post.
3. Look at the other cards with that hashtag and show some love to your fellow card makers!!  Let's make this fun!!
 
There is also a PRIZE with each Challenge!!  One LUCKY Participant will receive a Stamp Set of their choice!! SQUEAL!! =)  The Winner is random, so all card making skill levels are welcome!!
THANKS SO MUCH for stopping by and I hope you'll come back tomorrow for another Intro from the New August Release!! Have a FABULOUS WEEK!!
COUNTRY HUGS-N-KISSES
LARISSA   =)