Wednesday, October 26, 2016

Sparkly Season's Greetings

Hello!  It is Lisa here with you today and I have a super sweet and sparkly Christmas card to share.  This card was created with the new Cardinal Greetings Stamp set and I just love the classic elements in this set and all of the various ways you can use them...


To create this card I started with an oval frame diecut out of the middle of my card front.  I then stamped my bird and tree image onto separate Neenah White Card stock, colored them in with my Copics and white gel pen, and trimmed them out.  These were set to the side while I cut a piece of acetate slightly larger than the oval window and adhered double sided tape to cover the entire piece of acetate.  This too was set to the side while I adhered the tree branch to the backside of the oval, and the bird onto the front side.  The adhesive covered acetate was then laid behind all of this covering the open "window", and then covered with Martha Stewart glitter.  At first I had contemplated using white glitter to give a snow effect, but I felt like it would blend too much into the cardbase and so I chose the blue to really give a pop, and it did!  I then finished the card by stamping the sentiment in a green ink and adhering some Pretty Pink Posh Sequins.

Thank you for stopping by and Happy Crafting!
Lisa

Tuesday, October 25, 2016

If It Was My Birthday...

Good morning everyone! It's Cassie back with another card today! I've got a card using the Coffee Craze stamp set and the brand new Snarky Birthday Sentiments stamp set. When my sister read the sentiment that I used today she said it sounded just like me. So of course I had to use it! Here's a look at the card


The card today was really easy to make. I started with a piece of Bristol Smooth cardstock. I've been reaching for this nonstop lately because it blends my Distress Ink so well. It's nearly fool proof-which is awesome. I put down lines of washi tape to create a masked stripe pattern. Then I took the colors Stained Walnut, Picked Raspberry and Spun Sugar and blended the colors onto the cardstock. I spritzed the paper with water to get the splotchy distressed look.
Next I stamped my all time favorite coffee cup stamp onto some more Bristol Smooth cardstock. What I love about this image is that it can be more than just coffee. I'm not a coffee drinker, so I like the versatility there. I used my Distress Inks and a paint brush to color it in. I made it look like one of those cotton candy frappes that you can get from Starbucks so that it would match my color combo. I LOVE those things. Just looking at the card makes me want to go get one! When that was completely dry I heat embossed the "treat yo' self' sentiment onto the cup. It's hard to see because it was embossed with white embossing powder, but in real life it's pretty dang cute.
 
Finally I stamped my sentiment on the bottom, center of the card panel and heat embossed it with gold embossing powder. This sentiment just cracks me up! I love this set because I'm such a sarcastic person, and it fits my personality so well. After that was heat set all that was left to do was to pop the drink onto the card using some foam tape.

I hope you enjoyed the card for today! Who else is going to run out and grab their favorite drink now? I'm thinking a caramel apple spice from Starbucks!! Thanks for stopping by and I'll see you again soon with another card!

Monday, October 24, 2016

Christmas Blessings One Layer Scene!! =)

Hello Mint Owl Studio Friends!!
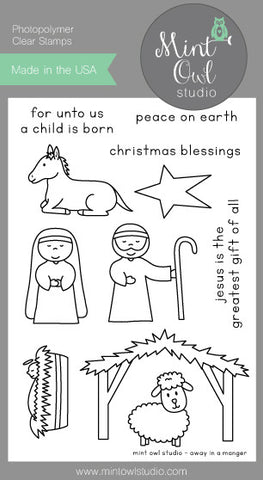
Larissa here today with a very Sweet and Simple Card Design using the "Away In A Manger" Stamp Set!!
Away In A Manger
I was going for a Soft Scene using the Manger and Baby Jesus and the North Star, but I didn't want to loose the scene against a really Dark Sky so I opted for a lighter sky color using Tumbled Glass and I REALLY LOVE the way that it turned out!! I Stamped and Embossed ALL of my Images and then I watercolored using Distress Inks!! I added some Glitter Pen to the Star and the top of the Manger and then Stamped and Embossed the Sentiments and my Card was done!! I LOVE Cards like this for Mass Producing especially during the Holiday Season!! It makes it SO FAST!!

THANKS SO MUCH for stopping by today and I hope you have a FABULOUS WEEK!!
COUNTRY HUGS-N-KISSES
LARISSA    =)

Saturday, October 22, 2016

Sorry I'm so slow.

Hello everyone,

I'm back with a belated birthday card.  I'd like to say that I am always on time with birthdays but I'm not so this stamp is perfect.  

This sloth from the Sloth Hang Out set is just adorable and with a sweet little smile on his face.  Makes getting a late birthday card so much better.  


I stamped the image on to some white card stock and I coloured him in with my copics.  I fussy cut him out and set him aside.

I used a piece of light weight grey paper I have in my stash and added it to an A2 size card base.  I then die cut two frames with a rectangle frame die and popped them up with foam tape and added them to the card.

Of course in true Coralynn style I forgot to stamp the sentiment before adding the frames so I stamped it with black ink and added the little leaves around the card to finish it off.

Thanks so much for stopping by, see you again soon.

Coralynn  :)


Friday, October 21, 2016

Hope Your Birthday Was Happy

Good morning everyone and happy Friday! It's Cassie here with another card for you. I'm using the Sloth Hang Out stamp set. I love this cute little sloth! He is ADORABLE! I am the worst about sending cards out on time, so when I saw the cute sentiment I knew this set was going to be one I reached for a lot.
This card was so easy to make. I started by stamping the sloth onto some Bristol Smooth cardstock. I used my Zig Clean Color Real Brush markers to color him in. Next I die cut the circle with stitching out of another piece of Bristol Smooth cardstock.
I have a scalloped die that fits perfectly in the circle so I colored the scallops in with my Zig markers to match the green on the leaves. It gave a great pop of color.


To finish the card I stamped the sentiment in some black ink. That's it for today's card! I hope you enjoyed it. Have a great weekend and I'll see you again soon with another card!

Thursday, October 20, 2016

Altering Your Stamps featuring Sloth Hang Out

Happy Thursday, friends!  It's Tara and today I am back with an adorable project featuring the brand new Sloth Hang Out stamp set from Mint Owl Studio.


I wanted to share how you can take a stamped image and alter it to create a completely different look.  This sweet little sloth comes hanging on a branch but by cutting him out and away from the branch I was able to hang him on the frame on the front of my card!  How much fun is that?


This is a simple card design that packs a big punch by making that cute critter a part of the layout!


Thanks so much for stopping by today!  I will see you again soon!  Bye!


Wednesday, October 19, 2016

And A Happy New Year

Hello!!!  It's Lisa here with you today and aren't you just loving the newly released stamp sets?!  I sure am!  Today I'm sharing a pretty little Christmas card with you that uses the Cardinal Greetings Stamp Set...


To create this card I started by stamping the bough image all the way around a panel in various green inks.  I then went over the panel with Tumbled Glass Distress Ink and die cut the bottom edge.  Next I die cut a star and stamped my sentiment in the center of it.  I finished it all off with some blue sequins.

This card was super easy and could be used for mass production purposes.  Feel free to share with us what you are creating with your Mint Owl Studio Goodies on any of our social media sights, or by tagging us on your own sites!

Happy Crafting!
Lisa