Showing posts with label fussy cutting. Show all posts

Friday, December 2, 2016

Holiday Greetings


Hello everyone,

I'm back with another holiday card and it was pretty easy to put together.  This would be a good one to mass produce.

I used the reindeer from the Deer Santa stamp set and I just stamped out his head and coloured him in with my copics.  I then fussy cut him out and went around the edges with a black marker to them up.


 I then cut out the circle in the middle of the card and after I used a triangle die to cut out the panel.  I then used a piece of grey kraft card stock cut out another panel with the scalloped rectangle and added it to an A2 sized card base. I cut out a little piece of patterned paper and added it behind the circle.  I then popped up the front panel with fun foam and added foam tape to the reindeer.  And as usual I forgot to stamp my sentiment.  So luckily I used fun foam so it stamped nicely.  I used the Cardinal Greetings stamp set with black ink.


To finish off the card I added some sequins from the Mint Owl Mix.

Thanks for stopping by, see you again soon!

Coralynn  :)

Monday, October 31, 2016

Happy Birthday Matey!! =)

Hello Mint Owl Studio Friends and
HAPPY HALLOWEEN!!
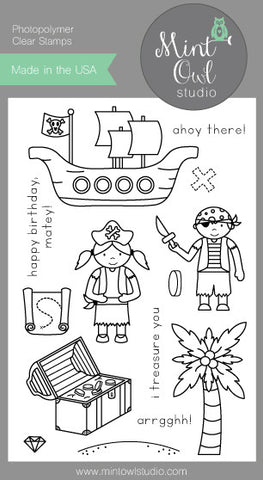
Larissa here today to share a FUN Interactive Happy Birthday Matey Card!! I wanted to make something that would correlate with Halloween and I thought this was the PERFECT choice!!
I started by Stamping and Embossing ALL of my Images from the AWESOME
"A Pirate's Life" Stamp Set!!
A Pirate's Life
 I used my Distress Inks to Watercolor them!! I Fussy Cut them out and leaving a small white border to Finish off the Edges!! I wanted to create an Interactive Card so I created the Channel in the Ocean for the Pirates Ship to be able to Glide across the Ocean and to Land on the Shore!! I Layered all of the other Images and Stamped and Embossed the Sentiment too!! I just LOVE LOVE LOVE the way it turned out!! =)
                           
 Hopefully you feel INSPIRED to create a FUN Interactive Card using your Mint Owl Studio Products and if you do I hope you'll share the with us because we LOVE LOVE LOVE to see what you create!! THANKS SO MUCH for stopping by today and I hope you have a
FABULOUS WEEK!!
COUNTRY HUGS-N-KISSES
LARISSA     =)


Saturday, October 29, 2016

Deck the Halls

 Hello everyone,

I'm back with a Christmas card from our Trim the Tree stamp set and the Christmas Quilt Stencil.

As I was creating this card my daughter wanted to help so she fussy cut one of the boughs and I added it along with the others.  She will be tickled that it made it to a blog post!


I stamped and coloured in the ornament and pine boughs black in and coloured them in with my copics.  I fussy cut these out and for the ornament, I added glossy accents to make it shiny.

For the front panel, I used the Christmas Quilt Stencil and blended in Candied Apple and Lucky Clover distress inks.


To create the card base I die cut two panels and scored one of them on the top at about 1/4 down and adhered it to the front panel making this a shaped card.  

I cut out a smaller panel and stamped the sentiment with black ink and popped it up on foam tape.  I then added the boughs and ornament. 

Thanks for stopping by, see you again soon. 

Coralynn  :)


Saturday, October 8, 2016

A party without ice cream...

 Hi everyone,

I'm back with a yummy card for you today.  As much as I love fall and fall cards I also love ice cream and thought I would make a card with the Sweet Treats stamp set and Sprinkles stencil.


I started out with a piece of white card stock and added three colours to some embossing paste.  I used the Sprinkles stencil and added each colour diagonally across the panel. I set that aside to dry.


I then stamped the candy with black copic safe ink and coloured them in and fussy cut them leaving a very small white border.  Mainly because I need to practice my fussy cutting and can never get a nice even edge.  But that's just our little secret.  ;)


I cut out two circles from vellum and on the smaller one I stamped and heat embossed the sentiment with cracks me up.  I cut down the embossed panel and added the circles and popped up the candy with foam tape.

That's it for me.  Hope you get some crafty time this weekend!

See you again soon.

Coralynn  :)


Saturday, September 17, 2016

A Child is Born

Hello everyone!

I'm back with another card with this months release which is available today in the shop

For my card I used the "Away in a Manger" stamp set along with the "Christmas Quilt" stencil.  I used what I'm calling the reverse stencil technique with I did with my previous card.  This was the second stamping to use up the ink left of the stencil. I then took some watercolour paints and coloured in the background.  


I used a circle from my stash along with a banner die cut from black card stock. I heat embossed the sentiment with white embossing powder and adhered it to the front panel. I then coloured and fussy cut Baby Jesus and popped it up with foam tape.  To finish off the card I added some Sparkle pen to the watercolour panel but you can't see it in these pictures.


We hope you'll head over to the shop to treat yourself with a few, or the entire release for this month!

Thanks for stopping by, see you again soon.

Coralynn  :)