Wednesday, November 30, 2016

His and Her Gift Card Holders


Hello wonderful crafty friends!  It is Lisa here with you today sharing some cute his and her Holiday Gift Card Holders.  I don't know about you, but I tend to have quite a few gift cards to give out during the Holidays and I always want something cute to give them in, so the recipient still feels like they have something to open, you know what I mean?  And I think these little guys are just the thing...


To decorate my gift card holders I used the Packaged Pretty Die Set for the front with Fancy Pants Patterned Paper.

For the back of my gift card holders I used the Mini Banner Die Set and adhered them on their side before stamping my sentiments from the Banner Sentiments 2 Stamp Set.

Yes, this is a super easy project, but isn't that just what we need during the Holidays when we can't seem to find enough time for anything?  Love it!

Happy crafting and thanks so much for stopping by!
Lisa

Tuesday, November 29, 2016

Dear Santa,

Good morning everyone! It's Cassie here, and I feel like it has been forever since I have posted a card, which is silly since I was just here last week. Thanksgiving and the long weekend were both amazing, and I hope yours was as well. I'm here with a bit of a different holiday card t share with you.
I made this cute and non-traditional colored card for the cutest new addition to our extended family. First Christmas's are so exciting, and having another little cousin has given me a new look on card making. For this card I stamped the dump truck from the Under Construction stamp set on some Neenah Solar White paper. Then I took a pencil and drew in a string of lights on the top of the truck. I love the idea of going through my MOS stamps and picking images that could be presents you'd find wrapped up at the holidays, and this truck would be perfect for that! I used a Copic Multiliner to draw in the lights and string, because I knew I wanted to color the image in with my Copics. Once I had colored it in I fussy cut the image out.
I stamped the present from Dear Santa all over the bottom half of a piece of Bristol Smooth cardstock with a waterproof black ink. Then I took my Zig Clean Color Real Brush Markers and colored them in to match the truck and lights. It's a very different color combo-especially for a holiday card, but I think it works. I splattered white paint over the top of the presents and set the piece aside to dry. Once it was dry I attached it to the bottom of my card base.
I took another piece of Bristol Smooth cardstock and cut it down to fit the card base. I die cut a stitched scalloped edge on the bottom so my presents would show and stamped it with the "dear santa," sentiment from the Dear Santa set. I attached it to the top of the card base. My last step was to die cut a stitched circle to highlight the truck. I scribbled a blue Zig marker on it and evened it out with some water. Once it was dry I attached it above the sentiment with some foam tape and did the same with the truck. I added a little sparkle to the lights with my Spectrum Noir Shimmer pen, and the card was finished!

Thanks so much for stopping by today! I hope you enjoyed my card, and I'll see you again soon with another one!

Monday, November 28, 2016

Merry Christmas & a Happy New Year Shaker Card!! =)

Hello Mint Owl Studio Friends!!
Larissa here to share a FUN Holiday Shaker Card!! I've used the
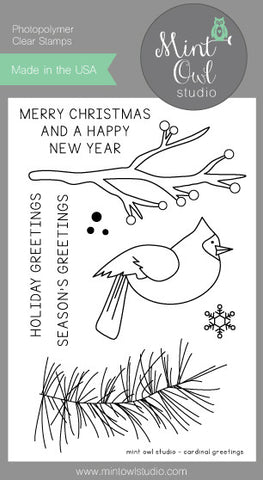
Cardinal Greetings Stamp Set!! 
Cardinal Greetings
I Stamped and Embossed the images onto Distress Watercolor Paper!! I then Watercolored them using Distress Inks and then Fussy Cut out the Cardinal and the Branch!! I wanted some Pine Trees so I used Distress Inks and Stamped them then coated them with some Clear Embossing Powder!! I Die Cut a Stitched Circle for the Shaker Window and added some Acetate and Fun Foam!! I used the Honey Bee Stamps Poinsettia Sequin Mix for my Shaker Elements and then added some Nuvo Red Slippers Drops for the Berry's and some Nuvo Morning Dew Drops for the Beak!! I LOVE LOVE LOVE the way it turned out!!
THANKS SO MUCH for stopping by and I hope you ENJOY some Cyber Monday Shopping!!
We're having a HUGE SALE so don't forget to check it out!!

Have a FABULOUS WEEK!!
COUNTRY HUGS-N-KISSES
LARISSA    =)


Saturday, November 26, 2016

Merry Christmas Tag

Hello everyone,

Happy "day after" Thanksgiving!  I hope you were able to get lots of turkey and time with family.

I have a tag to share with you today.  As nice as it is to have a card for each give, sometimes it's fun to add a special tag instead.  

I started out with stitched tag stax from MFT and cut out the first panel from Neenah desert storm card stock and then another tag the next size up from green card stock from my stash. 


I used the pine branch from the Cardinal Greetings stamp set and stamped it with green ink with first and second generation stamping to give it some depth.  I added the berries with versamark ink and heat embossed them with red embossing powder.  I did the same thing with the sentiment.  

I added the smaller tag to the bigger one with foam tape and as usual I forgot to add the hole at the top for the twine.  So I did this very carefully and added it with my crop-o-dile and added some Lawn Fawn lawn trimmings in gold.  You can finish off the tag by adding a TO and FROM to the back. 


Thanks for stopping by, see you again soon!

Coralynn  :)

Wednesday, November 23, 2016

Black Friday Sale

Hello!

We are having a HUGE Black Friday - Cyber Monday Sale that starts today!  Take 25% off your entire order with the coupon code BLACK25.


All orders will start shipping next Tuesday, November 29th.  Happy Shopping!

Holiday Greetings!

Hello!  It is Lisa here with you today and I am so excited to share this fun and shiny Christmas card with all of you...


To create this card I started by laying the Christmas Quilt Stencil over Black cardstock and applying versa mark ink.  I then lifted the stencil and added some Wow! Embossing Powder in Cha Cha Cha. After this was heat set I adhered it to a panel of gold foil cardstock.  Next I stamped and embossed both the bird and sentiment from the Cardinal Greetings Stamp Set with a gold embossing powder.  I then adhered these to my card and ta da!

These are not typical colors I think of when creating Christmas cards, but I think it works well and really creates a rich look.

Thanks so much for stopping by and feel free to share what you are creating with your Mint Owl Studio goodies on any of our social media sites!
Happy Crafting!
Lisa

Monday, November 21, 2016

Merry Christmas

Good morning everyone! It's Cassie here, and I've got a holiday card to share with you today. I made this card using the Cardinal Greetings stamp set. This is such a great set, because it really has everything you need to make many different holiday cards. I've made a bunch of different cards using it this year!

I started by stamping one of the branches on some khaki cardstock. It's such a fun look to have a light colored cardstock instead of just white. I colored in the branch and berries using my Copic markers.
Then I stamped the sentiment in VersaMark and heat embossed white powder on it. I colored the bird in with my Copics and cut it out. I attached it with some foam tape so that it looked like the bird was sitting on the branch. I stamped the snowflake all over the background in VersaMark ink to make a tone on tone look. Then to make it look even more snowy I drew little white dots with my gel pen. To finish it off I added some Glossy Accents on the berries and attached it to a card base.

I hope you liked the card today! I'm going to have to try another card with a colored base again soon, because I loved how it turned out. I hope you're having a great week! Thanks for stopping by, and I'll see you again soon with another card!!